Wednesday, October 28, 2015

The Mad Science Experiment


In the spirit of Halloween, let's think of these as a mad scientist's experiment. These cupcakes are my Frankenstein.  What I WAS making and what I ended up with were very different things.  Both had exactly the same ingredients.  Both would have been delicious.  One looked like the Bride of Frankenstein and the other like "Abby something...Abby Normal!" (my favorite line from Mel Brooks' Young Frankenstein.)

I started by making chocolate cupcakes.  The original recipe called for Devil's Food cake but I have been making Hershey's Perfectly Chocolate Cake recipe since I had my own stool in the kitchen in order to reach the counter, so I used the latter recipe. (By the way, that recipe is bulletproof!) 

You then make what is essentially marshmallow fluff or what Martha calls  "7 Minute Frosting."  Basically you whip a whole lot of egg whites with sugar, cream of tartar, and vanilla and then heat it (in a bowl) over simmering water while whisking for about 7 minutes to melt the sugar.  Then you whip the egg white mixture again for about 12 minutes with a stand mixer until the egg whites form stiff peaks.  Or in my case, your entire kitchen and person are thoroughly sticky. The frosting is beautiful, glossy, and white as a ghost!  It made me want to shrink myself and jump right into the bowl of fluffy, sugary goodness.

Cannonball!

Don't you just want to poke your finger in that!


What I was TRYING to make were these cool little cupcakes called Hi Hat Cupcakes.  You swirl the fluffy frosting onto the flat top of a cupcake, chill them, and then magically dip the top into melted chocolate that hardens like Magic Shell.  The result is a tall, iced cupcake with a glossy, dark chocolate shell that takes on the swirl from the marshmallow frosting.  Trust me, they are to die for. 
Unfortunately, I must not have had stiff enough peaks because as soon as I turned the cupcake upside down and dipped it into the chocolate, the chocolate pulled the frosting. Oh the mess I made! I was making them to take to a party so needless to say I had to improvise pretty quickly.  I chose to drizzle the chocolate over the marshmallow frosting and sprinkle with orange jimmies.  


Hershey's Perfectly Chocolate Cake Recipe
Makes about 30 cupcakes.  
Preheat oven to 350F

  • 2 cups granulated sugar
  • 1 3/4 cups all-purpose flour 
  • 3/4 cups Hershey’s cocoa 
  • 1 1/2 teaspoon baking soda
  • 1 1/2 teaspoon baking powder
  • 1 teaspoon salt
  • 2 eggs
  • 1 cup milk
  • 1/2 cup canola oil  (I use fruity olive oil)
  • 2 teaspoons vanilla
  • 1 cup boiling water
  1. Combine the dry ingredients in a large bowl. Add the eggs, milk, oil, and vanilla. Beat with a hand or stand mixer until completely mixed, 30 seconds to 1 minute. Stir in the boiling water. The batter will be thin.
  2. Line muffin tins with cupcake papers (Recipe yields 30 cupcakes)  Fill papers about 2/3's full with batter.  Cook for about 22-25 minutes.
  3. Let cool for about 10-15 minutes in the tins, and then remove to baking racks and cool completely. 

Martha Stewart's 7 Minute Frosting Recipe


  • 2 1/2 cups sugar
  • 6 large egg whites, room temperature
  • 1/2 cup water
  • 1/2 teaspoon cream of tartar
  • 1 tablespoon pure vanilla extract
  • In a bowl add all the ingredients and start whipping in a stand mixer until it starts to get frothy.  Remove bowl from mixer and set over a simmering sauce pan.  Continue whisking until all the sugar is dissolved and it mixture is just warm to the touch.  Remove bowl and bring back to the mixer.  Whip increasing speed for about 12 minutes or until you have STIFF peaks.  Frost cupcakes using a pastry bag and make generous piles of swirly frosting!  Chill for 2 hours before attempting to dip or for drizzling. 
Chocolate "Shell"
12 oz of semi-sweet chocolate chips, melted and cooled
3 T canola or safflower oil

Mix oil with chocolate and stir.  This will harden some so you want work somewhat quickly. Drizzle on cupcakes as desired.

Monday, October 26, 2015

Confit Tomatoes will change your life!


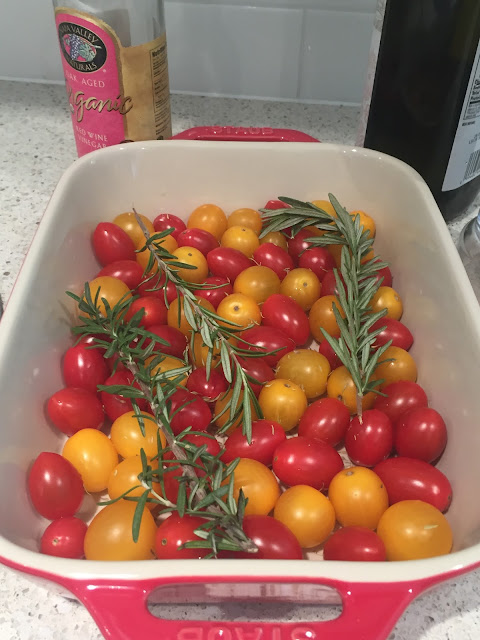
These are a staple in my house.  Confit tomatoes are an easy addition to almost any dish and they turn even the most mundane into something special.  Confit simply means slowly roasted to preserve.  These tomatoes cook for three hours but on low heat.  I often make them after I prep dinner and then pop them into the oven as I sit down to eat. That way they are ready to take out of the oven before I go to bed.  Bonus:  your whole house will smell like a Tuscan grandmother's on a Sunday afternoon.  That's a really good thing!  

They store really well for about a week in the refrigerator.  I use the oil to flavor other dishes and the tomatoes on a grilled steak is just about the best thing ever.  

The tomatoes cook for a long time but because of the low heat, they hold their color and shape. They kind of burst in your mouth like you are deflating a balloon.  The low heat intensifies the tomato flavor as well as the garlic and fresh herbs infuse into the tomatoes making them full of roasted, mellow garlic goodness.  Great all times of year!  Tonight I am having them on spaghetti squash with wilted spinach.  I can't wait to finish typing so I can get to it!

The recipe is Tom Douglas'.  I used to be OBSESSED with him.  I have a thing for self-taught chefs that celebrate local ingredients.  I met him at a food show about 10 years ago and turned into a giddy school girl - it amazes me what a dork I can be.  I would be unfazed by Brad Pitt (bad example) but I am totally stupid in front of talented chefs.  

The recipe is adapted from Tom's Big Dinners.
I use what's in season for herbs and have used heirloom tomatoes - use the recipe as a guideline and make them your own.  Tomatoes and this recipe are very forgiving.

Preheat oven to 225F.

1 1/2 pounds of cherry tomatoes.  
1 cup olive oil
3 stems of fresh rosemary sprigs
3 stems of fresh thyme sprigs
3 smashed cloves of garlic
2 teaspoons of red wine vinegar
1 teaspoon chopped fresh thyme
Salt and pepper

Rinse tomatoes - I use the Tovolo Soak & Strain.

Line the cherry tomatoes in a single layer in a roasting pan.  Add all other ingredients over the tomatoes and bake in the oven for 3 hours or until the skins of the tomatoes are wrinkled but they still have their shape.
Remove sprigs of herbs and discard them. Serve tomatoes immediately over everything!  
Keep the unused portion with the oil in an airtight container in the refrigerator. To use, bring to room temperature or heat in a skillet until oil is liquid.
*they get better the second and third day as all the flavors get cozy with one another.  I love to use really coarse sea salt with them for a little crunch.
Tell me how you use them!  I am always looking for new ideas on how to improve on this favorite of mine.

Before!

After!

Thursday, October 22, 2015

Boo! Halloween Cookies!


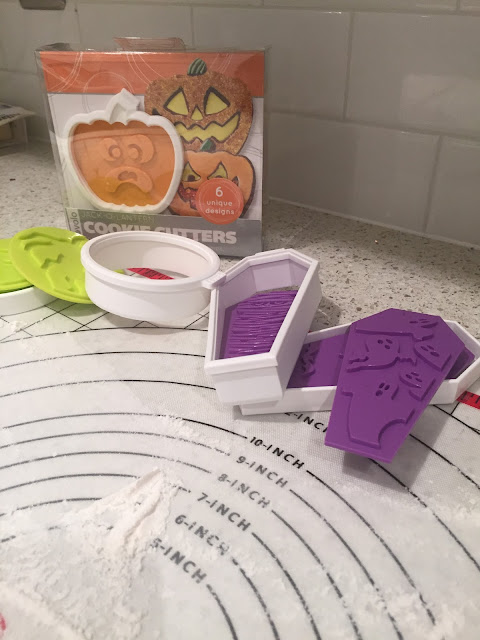
Two years ago, Tovolo came out with Halloween Cookie Cutters.  It took a while for us to get it right. When we decide to get into a new product category, we take it really seriously.  Tovolo doesn't make things just be to be as good as what's out there.  If we decide to enter the market with a new product it is because we want to do it better!  We want to offer a solution to what isn't working and strive to make cooking or baking easier.  These cookie cutters are just that solution.

The original discussion stemmed out of frustration from looking at all the beautifully decorated holiday cookies out there that no normal human can replicate!  We wanted to try to figure out how we could make a cookie cutter that made it easier to decorate or still looked great naked if you didn't want to do any decorating at all. (me)

What if it made an impression in the cookie dough like the ones from the 50's did?  Those were great but often the design baked out.  How could we use one size cookie cutter and have lots of different optional plates that fit into them so you have a variety of characters to fit your personality? 

Well, after a long time and LOTS and LOTS of batches of cookies, we released Tovolo's answer to cookie baking.  They could not be easier to use and whether you decorate or just leave the cookie au natural the design is there and visible!
Our cookie cutters work equally well on a basic sugar cookie dough or gingerbread dough. You can use sugar, sprinkles, or icing and they all look great!

I like to start baking by laying out one of our Flexible Cutting Mats to use as a prep surface.  They keep me from making an even bigger mess than I would normally make by containing my ingredients.  The Flexible Cutting Mats also make it easier to pick up the mat and take everything to the sink when I am done. With one quick rinse - the mat is clean!  These can also go into the dishwasher so they have that going for them as well.  You will see in the picture Tovolo's new stainless steel measuring cups as well.  OMG! These are THE best measuring cups I have ever used.  I know I work for the company but holy cow these are amazing!  They are oval so everything just slides right out without getting gunk in the flat, round seam in the bottom of the cup.  They are kind of scoop-like as well so I can just reach into my canisters, no problem.  They even stay balanced on the counter when you have measured what you need but aren't ready to add it into the bowl or pan.  

The cookie dough recipe is a basic sugar cookie recipe given to me by our National Sales Manager, Kerry.  It works every time and it is our go-to recipe in the office when testing all things cookie.  With all cookie dough - do not over mix.  It is ok to have a little flour not completely mixed in, that way when you are handling the dough it will all get incorporated but you will still have a tender cookie.
I am also using a Tovolo Silicone Pastry Mat to roll out the dough.  Again, it contains the mess but also provides a virtually non-stick surface for dough.  You still need to dust with flour but trust me the mat makes a big difference.


Sugar Cookie Recipe
Ingredients:
1 c butter, softened
1 c sugar
2 eggs
½ tsp. almond extract
½ tsp. vanilla extract
3 ¼ c all-purpose flour
½ tsp. baking soda
½ tsp. baking powder
½ tsp. salt

Instructions:
1.       Preheat oven to 400°
2.       Cream butter and sugar.
3.       Add eggs, almond and vanilla.
4.       Mix all dry ingredients in a separate bowl and add slowly to butter cream    mixture until incorporated.
5.       Roll out on lightly floured board to desired thickness.
6.       Use cutters to stamp out shapes and place onto cookie sheet.
7.       Bake cookies for 7-10 minutes until cookies are light in color with light browning on the edges.


Have fun and remember there is no badly decorated cookie! (I hope.) 


Monday, October 19, 2015

Apple Cider Doughnuts


Autumn in New England is magical.  The leaves change into the most stunning array of yellows, oranges, and reds in every shade and nuance you could imagine.  If you have never gone to Northern New England in October, put it on your list.  No matter how good the fall leaves are where you live, you haven't seen anything yet! The light starts changing too in mid September, the air gets crisper, and the whole state of New Hampshire smells faintly of wood fires.

In my family growing up, we did a lot of hiking and apple picking in the fall.  In the last few weeks, I have gotten lots of family photos (especially with some new little ones experiencing their first true autumn) of leaves and apples. 

However, my brother is a gloater.

He lives down the street from this amazing family run farm called Applecrest Farm on the seacoast in New Hampshire.   It is the oldest and largest continuously orchard of its kind in the U.S.  He goes blueberry picking in the summer and apple picking in the fall.  He gloats about his access to the bakery at Applecrest because they make THE BEST apple cider doughnuts. (One of my favorite things they make.) This is another New England Fall tradition.  They have this aroma when they are warm unlike any other fall treat.  It is like apple pie, gingersnaps, and fresh doughnuts all mixed into one perfect fall breath. 
http://www.applecrest.com/

He sends me pictures of them.

It's cruel.

Today, I turned the evil table on him and made Apple Cider doughnuts in my kitchen!  In your face!  Ok, that's a little over the top but I was kind of proud of my first doughnut attempt.  I have always been intimidated by frying.  After doing it though - it was a cinch!  Being prepared (timing is super important) and having the right equipment was key to the success of my doughnut venture.
The recipe I used is from smitten kitchen.com (thanks!)because I trust her and because she knows her apple cider doughnuts.  (I will need to investigate if she is from New England) I have a few tips though that I have gathered along the way.

1. Do not over mix the dough.

2. Use plenty of flour.

3. Have layers of paper towels on hand to replace out as you go.

4. Instead of a plate with paper towels to absorb the excess oil, use a brown paper grocery bag and paper towels.  Less clean up and the oil will absorb into the bag.

5.  I prepared the cinnamon sugar in a small brown paper bag just like the doughnut pros in Pike Place Market do and it worked great unless you get super over zealous and don't know your own shaking strength - just saying :)


6. I used both Tovolo Tip Top Tongs to flip the doughnuts in the oil and a Tovolo Silicone Slotted Spoon because they both have silicone heads I didn't need to worry about the hot oil disfiguring my kitchen tools. Boo!


7. As I said before - Be Prepared.  Have the bag of cinnamon sugar ready to go before you start making doughnuts.  Have the paper bag and paper towels near where you are frying so you don't need to walk anywhere with a hot, oil dripping doughnut.  Have your tongs or slotted spoon next to the stove.


Apple Cider Doughnuts
adapted by smitten kitchenAdapted from Lauren Dawson at Hearth Restaurant
Makes 18 doughnuts + 18 doughnut holes (suggested yield for a 3-inch cutter; my larger one yielded fewer)

1 cup apple cider
3 1/2 cups flour, plus additional for the work surface
2 teaspoons baking powder
1 teaspoon baking soda
1/2 teaspoon ground cinnamon
1/2 teaspoon salt
1/8 teaspoon ground nutmeg
4 tablespoons (1/2 stick or 2 ounces) butter, at room temperature
1 cup granulated sugar
2 large eggs
1/2 cup buttermilk
Vegetable oil or shortening (see my explanation in the post) for frying
Toppings (optional)
Glaze (1 cup confectioners’ sugar + 2 tablespoons apple cider)
Cinnamon sugar (1 cup granulated sugar + 1 1/2 tablespoons cinnamon)
Make the doughnuts: In a saucepan over medium or medium-low heat, gently reduce the apple cider to about 1/4 cup, 20 to 30 minutes. Set aside to cool.
Meanwhile, in a bowl, combine the flour, baking powder and soda, cinnamon, salt and nutmeg. Set aside.
Using an electric mixer on medium speed (with the paddle attachment, if using a standing mixer) beat the butter and granulated sugar until the mixture is smooth. Add the eggs, one at a time, and continue to beat until the eggs are completely incorporated. Use a spatula to scrape down the sides of the bowl occasionally. Reduce the speed to low and gradually add the reduced apple cider and the buttermilk, mixing just until combined. Add the flour mixture and continue to mix just until the dough comes together.
Line two baking sheets with parchment or wax paper and sprinkle them generously with flour. Turn the dough onto one of the sheets and sprinkle the top with flour. Flatten the dough with your hands until it is about 1/2 inch thick. Use more flour if the dough is still wet. Transfer the dough to the freezer until it is slightly hardened, about 20 minutes. Pull the dough out of the freezer. Using a 3-inch or 3 1/2-inch doughnut cutter — or a 3 1/2-inch round cutter for the outer shape and a 1-inch round cutter for the hole from a set like this, as I did — cut out doughnut shapes. Place the cut doughnuts and doughnut holes onto the second sheet pan. Refrigerate the doughnuts for 20 to 30 minutes. (You may re-roll the scraps of dough, refrigerate them briefly and cut additional doughnuts from the dough.)
Add enough oil or shortening to a deep-sided pan to measure a depth of about 3 inches. Attach a candy thermometer to the side of the pan and heat over medium heat until the oil reaches 350°F*. Have ready a plate lined with several thicknesses of paper towels. (this is where I used the brown paper bag)
Make your toppings (if using): While the cut doughnut shapes are in the refrigerator, make the glaze by whisking together the confectioners’ sugar and the cider until the mixture is smooth; make the cinnamon sugar by mixing the two together. Set aside.
Fry and top the doughnuts: Carefully add a few doughnuts to the oil, being careful not to crowd the pan, and fry until golden brown, about 60 seconds. Turn the doughnuts over and fry until the other side is golden, 30 to 60 seconds. Drain on paper towels for a minute after the doughnuts are fried. Dip the top of the warm doughnuts into the glaze or cinnamon sugar mixture (if using) and serve immediately.

Enjoy!  There were DELICIOUS!


Thursday, October 15, 2015

Bittersweet Hazelnut Heaven


Do yourself a favor and don't make this recipe.  No good can come of it.

Oh Sweet Lord, why me?  Why did I make these blasted bars?  I keep getting tricked by making things I think are safe because I don't prefer an ingredient. I think I won't eat it only to find out I LOVE the ingredient, I just hadn't had it in the right context.  Dog gone hazelnuts!  

These are super easy to make.  I have already thought of a million variations you could make from the original recipe. (Coming to a blog near you.) They will make great Holiday gifts.  I took them to the Tovolo office and I kid you not, I could have gotten first born children from some the my co-workers based on reactions to these little morsels.  

They are addictive and wrong.  Save yourself - don't make them.

Ok.  If you do,  enjoy you are in for a treat.  (psst...do yourself a favor and save a few bars in the back of the refrigerator just for you.  Hide them in an old yogurt container or some other nondescript container that no one will be tempted to open.  You will thank me.  Rock on sister!)


I saw this recipe a few months ago on the blog Chocolate + Marrow - I love her blog.  Everything is super well crafted and you can tell she truly loves food.


Bittersweet: Bittersweet Chocolate Hazelnut Bars
Crust:
  • 5 oz of Petite Cocoa Batons from Trader Joes
  • ½ cup of semisweet chocolate chips, melted
  • ¾ cups of nutella
Ganache filling:
  • ½ cup of semisweet chocolate chips
  • 1 cup of bittersweet chocolate chips (I used Theo 70% baking bars)
  • 1 cup of heavy whipping cream
  • ¼ cup of unsalted butter, cut into small pieces
For topping:
  • ½ cup of toasted hazelnuts, ground (I am lazy and used bigger pieces which I thought looked more dramatic and added some additional texture)
  • I also added a little course sea salt which was delicious.
Method:
Line a baking pan with parchment paper. Let the parchment paper hang over the edge of the pan so you can easily grab it at the end.
Grind or mash the batons into pieces.  In a medium size bowl, stir together the batons, the melted chocolate chips, and ¾ cups of nutella. Pour into the prepared pan and smooth out. Place in the refrigerator to chill.
Heat cream in a small saucepan over medium heat. While cream is heating, pour ½ cup of semi sweet chocolate chips and 1 cup of bittersweet chocolate chips into a bowl.  Once cream is hot, pour it over the chocolate and let sit for 2-3 minutes, or until the chocolate is completely melted.  Add butter in small pieces and whisk until smooth.
Remove the crust from the refrigerator.  Pour the ganache over the crust and smooth with a rubber spatula or the back of a spoon.  Sprinkle with ground toasted hazelnuts. Return pan to refrigerator for 2 hours, or until firm.
Once firm, remove from refrigerator and peel off parchment paper. Slice into bars and serve immediately.  Or eat them all your self - you will get sick for sure but it will be so worth it!

Monday, October 12, 2015

Pumpkin and Cupcakes and Beer - OH MY!


I too have fallen under the spell of pumpkin.  I happily am not part of the PSL crowd but I do love my mother's pumpkin bread.  She would make it every Thanksgiving and we would eat it for breakfast for days with a generous dollop of cream cheese on top.  It was one of the first things I helped her make and I can still clearly smell that first batch.  Baking with my mother always made/makes me happy.  Every Fall as the light starts to change to that more muted gold in the mornings and the air gets a little crisper, I start thinking about all the wonderful foods that really come to life in Autumn.  Pumpkin is at the top of the list. 

These are Pumpkin Bread inspired cupcakes and just to really get in the mood, I made them with Pike  Brewing Co.'s Harlot's Harvest Pumpkin Ale.  I think it added a little bitterness and a caramel note to them.  I also added Theo Chocolate Nibs for texture and to add a little surprise of chocolate.  Pumpkin and chocolate are really good friends that don't see enough of each other!  

The cupcake recipe is adapted from thebeeroness.com.  This woman is a genius!  If you like beer (and who doesn't) then you will be inspired by her great combinations of using beer in baking and cooking.  I changed very little about the recipe itself.  I used cloves instead of allspice and I used olive oil instead of canola oil.  I also added the nibs.

For the frosting, I boiled down about 1/3 cup of the Pumpkin Ale to about 3 T of liquid.  It became really dark and rich in color.  Truth be told, I did't love what it did to the taste of the frosting.  I am omitting it from the recipe but I am telling you that it was a cool experiment. I just think I need to use a porter or a stout instead.  The base frosting is my favorite and the favorite frosting of everyone i make it for.  It is SUPER easy and foolproof. (I am that fool.)  I got the recipe from a lovely woman who runs a beautiful bakery in Fort Worth, TX called The Black Rooster.  If you are ever in the neighborhood - STOP!  She does a fantastic job on both pastries and bread.  

Ingredients
    For The Cupcakes
    adapted from thebeeroness.com
  • 2 cups flour 
  • 1/2 cup brown sugar
  • 1/4 cup white sugar 
  • 2 tsp baking powder
  • 1 tsp baking soda
  • 1 tsp salt
  • 2 tsp cinnamon 
  • ¼ tsp nutmeg
  • 1/2 tsp ground cloves
  • 1/2 tsp ground ginger 
  • ¾ cup pumpkin puree
  • 2/3 cup pumpkin ale (Pike's Harlot's Harvest Pumpkin Ale)
  • 2 egg 
  • 1 tsp vanilla extract
  • ¼ cup melted butter
  • ¼ cup olive oil 
  • 1/4 cup Theo Chocolate Nibs

Directions
  • Preheat oven to 350.
  • In a large bowl sort together the flour, brown sugar, white sugar, baking soda, baking powder, salt cinnamon, nutmeg, allspice, and ginger. 
  • In a small bowl stir together the pumpkin puree, pumpkin ale, eggs, vanilla extract, melted butter and canola oil. 
  • Add the wet ingredients to the dry ingredients and stir until just combined. 
  • Stir in nibs
  • Line 12 muffin tins with cupcake papers
  • Scoop the batter in the liners about 2/3 full. 
  • Bake at 350 for 18-22 minutes or until top spring back when lightly touched.
  • Cool completely on a wire rack.
For the Frosting
  • 4oz. cold butter
  • 8oz. cold cream cheese
  • 16oz. powdered sugar
  • 1 tsp vanilla extract
  • 1 T coffee, room temperature
  • 1 tsp pure maple syrup
  • 1/2 tsp cinnamon
In a mixer with a paddle attachment, add butter, cream cheese, and powdered sugar together on low speed.  Continue to increase speed as ingredients become incorporated.  Once everything is starting to get fluffy, scrape down the sides of the bowl and add vanilla, coffee, syrup, and cinnamon.  Keep beating the frosting for another 5 minutes or until the frosting is somewhat glossy, smooth, and fluffy. 

Ice cupcakes and serve.  Any leftover frosting can be stored in the refrigerator for up to a week.